The UMX™ Extra 300 3D makes the dream of a 3D plane that flies almost anywhere a reality. With a flying weight of barely over an ounce (just 33 grams battery and all), it is slow and light enough to fly extreme 3D maneuvers in spaces no larger than a dining or conference room. Its ingenious laser-cut foam airframe, designed by ETOC champ Seth Arnold, makes it all possible. And this BNF Basic version is ideal for the pilot who already has the required battery and charger and simply wants the plane. It comes completely assembled with a punchy 8.5mm coreless brushed motor and Spektrum™ AR6400L Ultra Micro DSM2 Receiver/ESC installed. Built-in long-throw servos on the AR6400L drive the elevator and rudder while two independent Spektrum AS2000L long-throw ultra micro servos drive the ailerons. The battery and charger are sold separately.
Completely built with servos, power system and Spektrum 2.4GHz DSM2 Receiver installed, but without the battery and charger
Small and light enough for experienced pilots to fly almost anywhere indoors
Advanced laser-cut flat foam structure and carbon reinforcement results in a lighter structure providing high-performance 3D flight in an indoor space
Requires a DSM2/DSMX aircraft transmitter capable of dual rates and exponential, 1S Li-Po battery and charger - Sold Separately
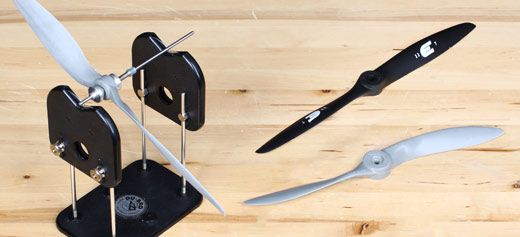
As we continue to push the envelope with our models, we are always looking for that next level of performance. We install larger engines or motors, performance mufflers, faster servos and other equipment that helps improve the overall performance of the model. We routinely overlook one part which can damage a models performance as well as its components. The invisible enemy of propeller vibration can damage electronics, engine bearings and weaken structures over time. We show you how to remove that vibration from your model to help you find a smoother running model with better performance over time.
This video shows you how to balance your prop using one of the best balancers in the industry. We explain and show setup of the balancer, what to look for when balancing, how to remove material or add material to a prop, as well as the final checks. Balancing props takes time and patience so we walk you through the process step by step to help you be successful in getting the most out of your balancer. Help lessen the vibration in your model by watching this video and learning the ins and out's of balancing propellers.
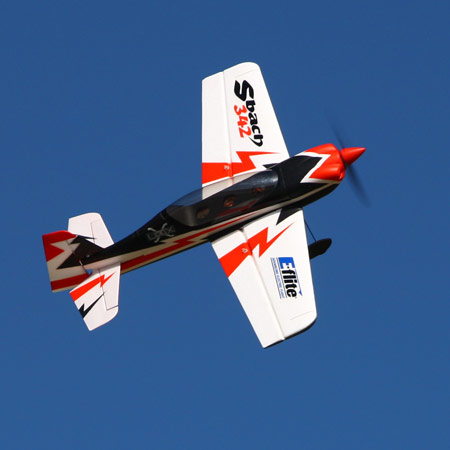
E-flite have added another Ultra Micro eXtreme (UMX) Model to their line-up with this Mike McConville designed 3D Sbach 342. All you need is a 4+ channel DSM2/DSMX compatible transmitter that is capable of programming Dual Rates and Exponential, and you're off!
The Sbach 342 is one of the most exciting full-scale aerobatic designs to come out of Germany since the first Extra. The brainchild of aerodynamic visionary, Horst Streicher, it's the first two-seat monoplane capable of truly holding its own in Unlimited-class competition. E-flite has captured the essence of the 342s incredible performance with this remarkably scale ultra micro that flies extreme aerobatics with the same sense of power and precision you would expect of a larger model.
Designed by world-class competitor Mike McConville, the E-flite UMX Sbach 342 BNF comes out of the box completely assembled and ready to be bound to any DSM2 or DSMX transmitter.
Features
Magnetic cowl hatch for easy access to the motor and battery compartment
Equipped with a 180BL, 2500Kv brushless outrunner motor
Includes Spektrum AR6400NBL DSM2 receiver/ESC unit and four AS2000L long-throw servos
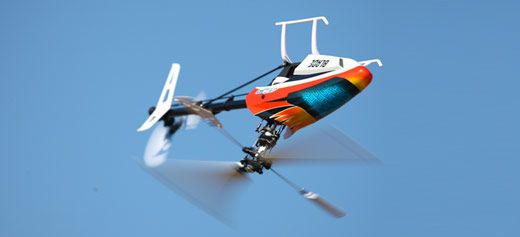
The Blade 450 3D RTF blasts ready-to-fly 3D heli performance to new levels of precision and power. It comes completely assembled and equipped for aggressive 3D aerobatics with state-of-the-art electronics and mechanics you would expect to find in more expensive kits that take hours to build. It’s even been flight tested and had the rotors balanced at the factory so you don’t have to do any setup. Simply charge its 3S 2200mAh 30C Li-Po battery and fly.
Available in both RTF and BNF Basic packages, this heli is ready to deliver for you in the way you want it. We talk with Mikel Graham, the developer of the new Blade 450 3D and he hits all the points that will show you why this is the heli to have. Entire new mechanics, servos, gyro, and ESC; it is all here ready to deliver to levels you only dreamed of. So check out the video and see what the hype is all about.
Constructed almost entirely of plywood and powered by twin Merlin V12s, the DeHavilland Mosquito Mk VI was incredibly fast and maneuverable for a plane of its size. This speed and maneuverability combined with its relatively long range earned it a variety of combat roles during World War II that included everything from low-level reconnaissance to anti-shipping and night fighter missions.
We meet with Matt Andren, the Product Developer on the Mossy to see what has come to life in this new Ultra Micro model. Matt addresses some of the hurdles they had to overcome in order to bring this twin warbird legend to life. Scale details include the twin counter rotating motors, authentic camouflage paint scheme, molded clear plastic canopy, removable landing gear with steerable tail wheel, hidden battery compartment and even dummy cannons. The 4-channel control with elevator, throttle, rudder and aileron provide full control for precise flying and maneuverability. So take a look and get ready to order yours today.
Complete replacement rotorheads have arrived for the Blade mCP X's and we are working hard to get these sent out to you as quickly as possible. If you currently own a Blade mC X please ensure you do not fly this heli until the issue is rectified and you send a return request for to Modelflight so we can send you this part asap.
We've been big fans of the Losi 1/24-scale Micro Rally Car and Micro SCT since we first laid eyes on them. These vehicles bring a lot of fun to the table thanks to the solid platform that handles quite well straight from the box. In today's day and age one of the first questions people have regarding any new vehicle is: can you convert it to LiPo power and how will it stand up to the additional stress—and the Micro Rally Car and Micro SCT are no exception.
We've taken one of our 1/24-scale Micro Rally Cars and merged it with one of the Losi Xcelorin Brushless systems to see exactly what is needed to perform this conversion. We've put everything together for you to follow along, both in video and written form. In the end we think you'll agree this is one fun project..
The right tools for the job
Before you begin, you'll need to make sure you have the right tools and components. You'll need:
If using the Stock Transmitter:
Losi 3-wire servo and 27MHz Receiver Combo (LOSB0830)
If using a Spektrum Transmitter:
Losi 3-wire Servo (P/N LOSB0814)
Disassembly process
Disconnect the servo from the receiver board and remove the receiver crystal.
There are seven screws that hold the two chassis halves together. One in the front, four on either side of the chassis towards the side and two towards the back. Remove these and set them aside; you'll need these later.
Once the screws are removed the two halves of the chassis should pull apart with little effort. Note that the servo may come off in the top half of the chassis or it may stay in the bottom. Either way remove the servo from the chassis at this time.
With the chassis cover removed the ESC/Receiver board is exposed. There are four screws that hold the board to the chassis at each of the four corners of the board. Remove these four screws.
Disconnect the motor from the plug that connects it to the ESC and route the battery plug out of the battery tunnel.
Turn the chassis over. There are two screws that hold the plastic motor guard in place. They will need to be removed. You will not re-use this piece later.
You can also remove the three screws that hold the motor mount to the chassis that can also be removed at this time.
Once the motor and motor guard have been freed from the chassis, you can remove the ESC's plug from the chassis. You should notice some hot glue on the tabs that keep the switch in place. You should be able to use a pair of needle nose pliers to pop this glue off with little effort.
Carefully pull one of the retainer tabs back as you push up on the switch from the bottom of the chassis. It will take a little work but the switch will come free. You may set the ESC/Receiver board off to the side as it is no longer needed.
Remove the two motor screws that hold the motor to the motor mount. Slide the pinion off of the motor's output shaft at this same time. You will need the pinion during the reassembly process.
At this point you should have a bare chassis without any electronics installed in it.
Reassembly Process
Using the screws removed from the original motor attach the new brushless motor to the motor plate.
lide the pinion onto the output shaft of the motor.
Reinstall the motor mount into the chassis. Leave the three screws loose until you have properly set your gear mesh.
Transfer the servo saver and arm from the original 5-wire servo to the new 3-wire servo. Make sure the servo is set to a neutral position before doing this.
Select a mounting location for the ESC on the chassis. You may want to snip off one of the standoffs that was used for the original ESC and Receiver. Note: if you do this, it is irreversible!
Route the battery plug into the battery tunnel. You have two options for this, towards the front or rear of the tunnel.
You can install the new ESC's switch into the old switch's position if you wish. You will need to carefully remove the shrink wrap from around the switch to allow it to fit.
Using servo tape, mount the ESC to the chassis.
Connect the motor leads to the ESC making sure the colors match.
Install the new servo into the chassis. Make sure that the servo arm properly engages the bellcranks and the servo sits as flush as possible on the chassis.
Route the ESC and Servo leads out of the top deck. The openings previously used for the servo lead and crystal work well for this application.
Carefully slide the chassis top deck into place. Be aware you may have difficulty getting the top deck reinstalled if the servo is not sitting flush on the bottom of the chassis. The motor wires can also cause an obstruction.
Once the chassis halves are together reinstall the 7 screws you removed earlier.
Mount the Receiver to the top of the chassis.
Plug the servo and ESC into their proper ports.
Bind the receiver to your transmitter. If using the 27MHz receiver, find a location on your chassis to mount the antenna to and reinstall the crystal you removed earlier.
If you are going to use a LiPo battery, make sure you use the programming card included with the Xcelorin ESC to set the proper voltage cutoff to prevent damaging your battery due to overdischarging it.
Testing
I've always enjoyed driving both the Micro Rally and Micro SCT. They're just so much fun, even in stock form. I opted to install the 8750Kv motor for this test instead of the 10250Kv system. I just cannot believe that it's possible for these to go any faster with the 10250 system as with a 2S LiPo this car is flat-out silly fast. Cornering becomes a bit more challenging with this much power and I highly suggest turning your steering rates down until you adjust to just how much faster this conversion goes.
This was a blast of a project to work on and was absolutely worth the time and effort. I'd estimate the total time to convert this over to brushless was close to an hour, give or take a couple minutes. I couldn't be happier with the final results as I now have a micro rocket ship of-sort. While we used the Micro Rally car for this conversion, the steps are identical if you have one of the Micro Short Course Trucks. If you have one or the other, you'll absolutely want to give this conversion a try.